Docker 搭建 MariaDB Galera Cluster 集群
前言
mariadb 现有动态列,支持 json 格式存储,类似 mongodb 的 bson ,但是操作能力较为尴尬,中间件有 spider ,我非常感兴趣的一个东西
关于 spider 这里有一篇很好的博文,有时间一定得尝试,Spider引擎分布式数据库解决方案
单机测试 MariaDB Galera Cluster
- 创建网桥
docker network create mgc
- 目录、配置文件初始化
mkdir -p /mnt/mgc/config /mnt/mgc/data01 /mnt/mgc/data02 /mnt/mgc/data03
chown -R 1001:1001 /mnt/mgc
cat <<eof|tee /mnt/mgc/config/my.cnf
[mysqld]
slow_query_log = on #开启慢查询日志
slow_launch_time = 1 #慢查询阈值
slow_query_log_file = mysql-slow.log #慢查询日志
innodb_buffer_pool_size = 256M #引擎缓存大小
innodb_file_per_table = 1 #表空间独立存储
max_connections = 500 #允许最大连接数
max_connect_errors = 1000 #允许最多链接错误次数
group_concat_max_len = 204800 #允许的最大长度
eof
- docker-compose.yml 文件
version: '3'
services:
  mgc01:
    image: bitnami/mariadb-galera
    container_name: mgc01
    hostname: mgc01
    restart: always
    environment:
      - MARIADB_GALERA_CLUSTER_BOOTSTRAP=yes
      - TIMEZONE=Asia/Shanghai
      - MARIADB_GALERA_CLUSTER_ADDRESS=gcomm://mgc01,mgc02,mgc03
      - MARIADB_GALERA_MARIABACKUP_USER=mariabackup
      - MARIADB_GALERA_MARIABACKUP_PASSWORD=mariabackup
      - MARIADB_ROOT_PASSWORD=123456
      - MARIADB_REPLICATION_USER=replication
      - MARIADB_REPLICATION_PASSWORD=replication
    ports:
      - 3305:3306
    volumes:
      - ./data01:/bitnami/mariadb
      - ./config/my.cnf:/opt/bitnami/mariadb/conf/my_custom.cnf
    networks:
      - mgc
  mgc02:
    image: bitnami/mariadb-galera
    container_name: mgc02
    hostname: mgc02
    restart: always
    environment:
      - MARIADB_GALERA_CLUSTER_BOOTSTRAP=yes
      - TIMEZONE=Asia/Shanghai
      - MARIADB_GALERA_CLUSTER_ADDRESS=gcomm://mgc01,mgc02,mgc03
      - MARIADB_GALERA_MARIABACKUP_USER=mariabackup
      - MARIADB_GALERA_MARIABACKUP_PASSWORD=mariabackup
      - MARIADB_ROOT_PASSWORD=123456
      - MARIADB_REPLICATION_USER=replication
      - MARIADB_REPLICATION_PASSWORD=replication
    ports:
      - 3307:3306
    volumes:
      - ./data02:/bitnami/mariadb
      - ./config/my.cnf:/opt/bitnami/mariadb/conf/my_custom.cnf
    networks:
      - mgc
  mgc03:
    image: bitnami/mariadb-galera
    container_name: mgc03
    hostname: mgc03
    restart: always
    environment:
      - MARIADB_GALERA_CLUSTER_BOOTSTRAP=yes
      - TIMEZONE=Asia/Shanghai
      - MARIADB_GALERA_CLUSTER_ADDRESS=gcomm://mgc01,mgc02,mgc03
      - MARIADB_GALERA_MARIABACKUP_USER=mariabackup
      - MARIADB_GALERA_MARIABACKUP_PASSWORD=mariabackup
      - MARIADB_ROOT_PASSWORD=123456
      - MARIADB_REPLICATION_USER=replication
      - MARIADB_REPLICATION_PASSWORD=replication
    ports:
      - 3308:3306
    volumes:
      - ./data03:/bitnami/mariadb
      - ./config/my.cnf:/opt/bitnami/mariadb/conf/my_custom.cnf
    networks:
      - mgc
搭建 MGC 集群
环境
- 系统版本:
CentOS 7.7 - RocketMQ 版本:
20.10.6 - Docker 版本:
19.03.13
| 服务器 | 名称 | 部署的应用 | 物理资源 | 存储挂载目录 |
|---|---|---|---|---|
| 192.168.0.231 | cluster0 | mariadb | 4C && 8G | /mnt/mariadb |
| 192.168.0.232 | cluster1 | mariadb、haproxy | 4C && 8G | /mnt/mariadb |
| 192.168.0.233 | cluster2 | mariadb | 4C && 8G | /mnt/mariadb |
拉取镜像
在三台服务器上分别执行如下指令:
docker pull mariadb:10.3
创建目录
在三台服务器上分别执行如下指令:
cd /mnt/mariadb
mkdir conf data
开启防火墙端口
在三台服务器上分别开启以下内网端口:
firewall-cmd --zone=public --add-port=4444/tcp --permanent
firewall-cmd --zone=public --add-port=4567/tcp --permanent
firewall-cmd --zone=public --add-port=4568/tcp --permanent
firewall-cmd --zone=public --add-port=3308/tcp --permanent
service firewalld reload
编写 server.cnf 文件
执行指令:
vim /mnt/mariadb/conf/server.cnf
注意:
- 这里的配置需要先注释掉
wsrep_cluster_address,因为要初始化用户之后再开始集群。wsrep_provider_options="gcache.size=128M",这里我是因为我的电脑固态硬盘容量有限才设置成128M实际使用请根据情况修改。
cluster0 配置如下:
[server]
[mysqld]
server_id=130
pid-file=/var/run/mysqld/mysqld.pid
socket=/var/run/mysqld/mysqld.sock
basedir=/usr
datadir=/var/lib/mysql
tmpdir=/tmp
user=mysql
skip-external-locking
skip-name-resolve
character-set-server=utf8
port=3308


#
# Instead of skip-networking the default is now to listen only on
# localhost which is more compatible and is not less secure.
#bind-address        = 127.0.0.1
#
# * Fine Tuning
#
max_connections=1000
connect_timeout=5
wait_timeout=600
max_allowed_packet=16M
thread_cache_size=128
sort_buffer_size=4M
bulk_insert_buffer_size=16M
tmp_table_size=32M
max_heap_table_size=32M
[galera]
wsrep_causal_reads=ON  #节点应用完事务才返回查询请求
wsrep_provider_options="gcache.size=128M"#同步复制缓冲池
wsrep_certify_nonPK=ON   #为没有显式申明主键的表生成一个用于certificationtest的主键,默认为ON
#log-bin=/app/galera/mysql-bin  #如果不接从库,注释掉
#log_slave_updates=1         #如果不接从库,注释掉
query_cache_size=0           #关闭查询缓存
wsrep_on=ON   #开启全同步复制模式
wsrep_provider=/usr/lib/galera/libgalera_smm.so #galera library
wsrep_cluster_name=MariaDB-Galera-Cluster
#wsrep_cluster_address="gcomm://192.168.0.231:4567,192.168.0.232:4567,192.168.0.233:4567"
wsrep_node_name=mariadb-0
wsrep_node_address=192.168.0.231
wsrep_sst_auth=syncuser:syncuser
#wsrep_sst_method=xtrabackup-v2
wsrep_sst_method=rsync
binlog_format=row
default_storage_engine=InnoDB
innodb_autoinc_lock_mode=2   #主键自增模式修改为交叉模式
wsrep_slave_threads=8  #开启并行复制线程,根据CPU核数设置
innodb_flush_log_at_trx_commit=0   #事务提交每隔1秒刷盘
innodb_buffer_pool_size=2G
[embedded]
[mariadb]
[mariadb-10.3]
注意这里的配置文件为第一个节点的配置,第二节点与第三节点仅做部分修改。
cluster1差异部分
...
wsrep_node_name=mariadb-1
wsrep_node_address=192.168.0.232
...
cluster2差异部分
...
wsrep_node_name=mariadb-2
wsrep_node_address=192.168.0.233
...
编写 docker-compose.yml 文件
cluster0 配置编写
注意:
command: --wsrep-new-cluster这个参数第在第一次启动mariadb初始化用户时需要注释掉,后续正式集群时再解开。
version: '3'
services:

  mariadb:
    image: mariadb:10.3
    container_name: mariadb
    environment:
      MYSQL_ROOT_PASSWORD: 123456
      TIMEZONE: Asia/Shanghai
    ports:
      - 3308:3308
      - 4444:4444
      - 4567:4567
      - 4568:4568
    volumes:
      - ./data:/var/lib/mysql
      - ./conf:/etc/mysql/conf.d
#    command: --wsrep-new-cluster
cluster1/cluster2 配置编写
后面两个节点的文件编写一致,需要注意的是,这两个节点的文件不需要
command: --wsrep-new-cluster这个参数。
version: '3'
services:

  mariadb:
    image: mariadb:10.3
    container_name: mariadb
    environment:
      MYSQL_ROOT_PASSWORD: 123456
      TIMEZONE: Asia/Shanghai
    ports:
      - 3308:3308
      - 4444:4444
      - 4567:4567
      - 4568:4568
    volumes:
      - ./data:/var/lib/mysql
      - ./conf:/etc/mysql/conf.d
初始化启动
分别进入三台服务器的 /mnt/mariadb 目录。执行以下指令:
docker-compose up -d
进去容器添加用户,三台服务器都要执行一次以初始化用户。以 cluster0 为例
[root@cluster0 ~]# docker exec -it mariadb /bin/bash
root@1195455508b1:/# mysql -uroot -p
Enter password:
Welcome to the MariaDB monitor.  Commands end with ; or \g.
Your MariaDB connection id is
Server version: 10.3.-MariaDB-10.3.+maria~jessie mariadb.org binary distribution

Copyright (c) , , Oracle, MariaDB Corporation Ab and others.

Type 'help;' or '\h' for help. Type '\c' to clear the current input statement.

MariaDB [(none)]> GRANT ALL PRIVILEGES ON *.* TO 'root'@'%'IDENTIFIED BY '' WITH GRANT OPTION;
Query OK,  rows affected (0.001 sec)

MariaDB [(none)]> GRANT ALL PRIVILEGES ON *.* TO 'syncuser'@'%'IDENTIFIED BY 'syncuser' WITH GRANT OPTION;
Query OK,  rows affected (0.001 sec)

MariaDB [(none)]> flush privileges;
Query OK,  rows affected (0.001 sec)

MariaDB [(none)]> shutdown;
Query OK,  rows affected (0.001 sec)

MariaDB [(none)]>
cluster1 节点,重复以上添加用户操作。 cluster2 节点 ,重复以上添加用户操作。
集群启动
在三台节点上分别停止容器并删除容器(注意操作,我这里是停止所有以及删除所有容器,数据挂载不要删除,只删除容器)
分别解开三个节点 server.cnf 文件中的 wsrep_cluster_address="gcomm://192.168.0.231:4567,192.168.0.232:4567,192.168.0.233:4567" 注释。
解开 cluster0 节点 docker-compose.yml 文件中的 command: --wsrep-new-cluster 注释。
注意,只有
cluster0节点才有这个注释。--wsrep-new-cluster只有在第一次集群,第一个节点,才需要加上,后续cluster0节点启动不需要此参数。
分别在 /mnt/mariadb 目录启动三个节点上的容器。执行以下指令:
注意:等
cluster0节点完全启动后再启动其他两个节点。
docker-compose up -d
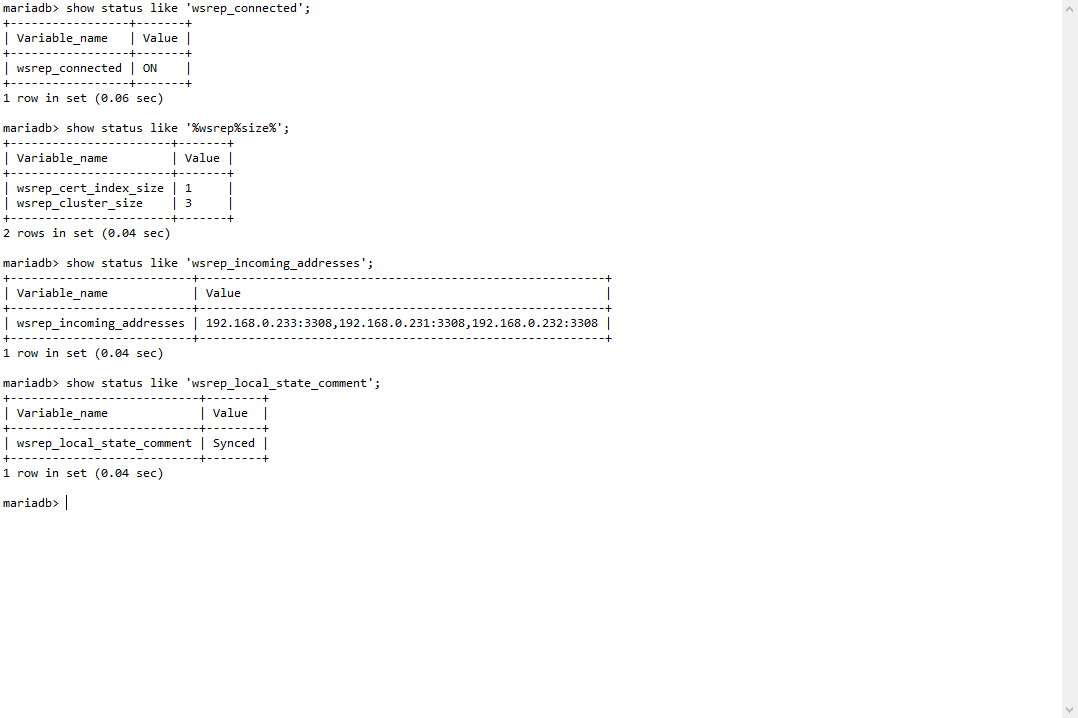
进入 mariadb 内查看集群状态。

指令如下:
show status like 'wsrep_connected';
show status like 'wsrep_incoming_addresses';
show status like '%wsrep%size%';
show status like 'wsrep_local_state_comment';
通过 haproxy 代理 MGC 集群
这里不搞 keepalive ,我相信 docker 的重启机制
在 cluster1 节点创建 haproxy 文件夹
mkdir -p /mnt/haproxy
编写 haproxy.cfg 文件
编写 haproxy.cfg 文件
vim /mnt/haproxy/haproxy.cfg
global
	chroot /usr/local
	daemon
	nbproc 1
	group nobody
	user nobody
	pidfile /opt/haproxy/logs/haproxy.pid
	ulimit-n 65536
#spread-checks 5m
#stats timeout 5000ms
#stats maxconn 100

defaults
	mode tcp
	retries 3              #两次连接失败就认为是服务器不可用,也可以通过后面设置
	option redispatch      #当serverId对应的服务器挂掉后,强制定向到其他健康的服务器
	option abortonclose    #当服务器负载很高的时候,自动结束掉当前队列处理比较久的链接
	maxconn 32000          #默认的最大连接数
	timeout connect 5000ms #连接超时
	timeout client 30000ms #客户端超时
	timeout server 30000ms #服务器超时
	#timeout check 2000    #心跳检测超时
	log 127.0.0.1 local0 err #[err warning info debug]

	listen mariadb
	bind 0.0.0.0:3306
	mode tcp
	balance roundrobin
	server s1 192.168.0.231:3308 weight 1 maxconn 10000 check inter 10s
	server s2 192.168.0.232:3308 weight 1 maxconn 10000 check inter 10s
	server s3 192.168.0.233:3308 weight 1 maxconn 10000 check inter 10s
编写 docker-compose.yml 文件
vim /mnt/haproxy/docker-compose.yml
version: "3"
services:
  haproxy:
    container_name: haproxy
    image: haproxy:1.7.14-alpine
    ports:
      - 3306:3306
    volumes:
      - ./haproxy.cfg:/usr/local/etc/haproxy/haproxy.cfg
启动 haproxy 容器
docker-compose up -d
教程结束,亲测在 cluster0 节点新增数据,cluster1/cluster2 节点会将 cluster0 节点的数据同步过去,enjoy。
后记
文章参考 : Docker MariaDB 10.3 Galera Cluster 集群同步复制 多主 Docker Haproxy 负载均衡